One Qt Example
Demonstrates combining Qt Quick and three.js rendering.
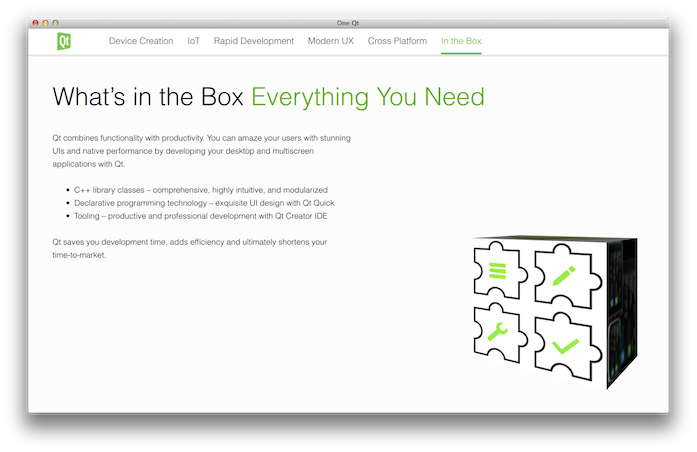
One Qt example demonstrates how to implement a simple QML 3D control that combines the use of three.js library-based Canvas3D rendering with Qt Quick 2D elements. The example shows a view with various benefits of using Qt with related images picked from http://qt.io. The images are displayed on the side of a spinning 3D cube that spins to show the correct image when the tabs at the top of the application are selected. You can also use swipe gestures to spin the cube to navigate between the tabs. The 3D cube control has been implemented as a simple QML type that internaly uses three.js library and Qt Canvas 3D.
Main QML File
In oneqt.qml, we build the 2D content as normal in QML. Then we add a custom ImageCube type into the scene behind the text elements. This custom type, implemented using three.js library, handles the painting of the 3D cube.
  ImageCube {
      id: imageCube
      width: 512 * (parent.width / 1280)
      height: 512 * (parent.height / 768)
      anchors.bottom: parent.bottom
      anchors.right: parent.right
      ...
Note: The ImageCube 3D UI component can be created and anchored just like any other QML type.
The Custom 3D QML Control
The ImageCube.qml takes six images that it loads and places to the sides of the cube. In addition, the type has a state that defines which of these images are visible and a backgroundColor property that is used when painting the 3D cube. The angleOffset property can be used to adjust the cube's direction when displaying the selected image. In this example the cube component sits on the right edge of the screen so we twist it slightly to the left so that it appears to be facing the rest of the content. This angle is also used by the 3D light so that the light always illuminates the selected face of the cube.
  state: "image6"
  property color backgroundColor: "#FCFCFC"
  property real angleOffset: -180 / 8.0
  property string image1: ""
      ...
The custom type defines six states, one for each side of the cube along with the x-, y-, and z-rotations, that must be set to show the face of the cube corresponding to the state.
  states: [
      State {
          name: "image1"
          PropertyChanges { target: cube; xRotation: 0; }
          PropertyChanges { target: cube; yRotation: 180 * 1.5 + angleOffset; }
          PropertyChanges { target: cube; zRotation: 0 }
      },
      ...
We use RotationAnimation to animate the transition between angles. It enables us to get smooth transitions between different cube orientations and to always rotate the cube along the shortest possible angle distance.
  transitions: [
      Transition {
          id: turnTransition
          from: "*"
          to: "*"
          RotationAnimation {
              properties: "xRotation,yRotation,zRotation"
              easing.type: Easing.InOutCubic
              direction: RotationAnimation.Shortest
              duration: 450
          }
      }
  ]
      ...
We call the JavaScript code that uses three.js to do the rendering of the cube, calling it on the initializeGL, paintGL, and resizeGL signals.
  onInitializeGL: {
      GLCode.initializeGL(cube);
  }

  onPaintGL: {
      GLCode.paintGL(cube);
  }

  onResizeGL: {
      GLCode.resizeGL(cube);
  }
The JavaScript Code
The JavaScript side of the implementation, imagecube.js, is done using a version of three.js that is ported for Qt Canvas 3D: three.js.
In imagecube.js, we start by creating the camera and the scene that contains all the rest of the three.js objects.
  camera = new THREE.PerspectiveCamera(50, canvas.width / canvas.height, 1, 2000);
  camera.position.z = 400;
  camera.position.y = 140;

  scene = new THREE.Scene();
      ...
Then we start the asynchronous loading of the textures and create a material array for the sides of the cube (note that the cube needs 12 materials as each side consists of two triangles).
  // Load textures
  var textureLoader = new THREE.TextureLoader();
  var textureCase1 = textureLoader.load(canvas.image1);
  var textureCase2 = textureLoader.load(canvas.image2);
  var textureCase3 = textureLoader.load(canvas.image3);
  var textureCase4 = textureLoader.load(canvas.image4);
  var textureCase5 = textureLoader.load(canvas.image5);
  var textureCase6 = textureLoader.load(canvas.image6);

  // Materials
  var materials = [];
  materials.push(new THREE.MeshLambertMaterial({ map: textureCase1 }));
  materials.push(new THREE.MeshLambertMaterial({ map: textureCase1 }));
      ...
We then create the needed geometry as BoxGeometry binding the created materials to the faces of the cube. We then create a MeshFaceMaterial from the array of materials.
  var geometry = new THREE.BoxGeometry(200, 200, 200);
  for (var i = 0, len = geometry.faces.length; i < len; i ++) {
      geometry.faces[ i ].materialIndex = i;
  }
  geometry.materials = materials;
  var faceMaterial = new THREE.MeshFaceMaterial(materials);
Finally we create the cube mesh from the geometry and material, position it, and add it to the 3D scene.
  cube = new THREE.Mesh(geometry, faceMaterial);
  scene.add(cube);
Next we create and add some lights to the scene. AmbientLight defines the surrounding light amount and the directional light is positioned so that it highlights the face of the cube that is currently selected.
  scene.add(new THREE.AmbientLight(0x444444));

  var directionalLight = new THREE.DirectionalLight(0xffffff, 1.0);

  directionalLight.position.y = 130;
  directionalLight.position.z = 700;
  directionalLight.position.x = Math.tan(canvas.angleOffset) * directionalLight.position.z;
  directionalLight.position.normalize();
  scene.add(directionalLight);
Final step in the initialization phase is to create the Canvas3D renderer and set the initial size and clear color (color of the background) to the renderer.
  renderer = new THREE.Canvas3DRenderer(
              { canvas: canvas, antialias: true, devicePixelRatio: canvas.devicePixelRatio });
  renderer.setPixelRatio(canvas.devicePixelRatio);
  renderer.setSize(canvas.width, canvas.height);
  setBackgroundColor(canvas.backgroundColor);
When we need to render the scene in response to the paintGL signal from Canvas3D, we just copy the current rotation values from the QML side to the cube mesh in the paintGL() method.
  function paintGL(canvas) {
      cube.rotation.x = canvas.xRotation * Math.PI / 180;
      cube.rotation.y = canvas.yRotation * Math.PI / 180;
      cube.rotation.z = canvas.zRotation * Math.PI / 180;
      renderer.render(scene, camera);
  }
For more information on how to use three.js the documentation is available here: three.js/docs
Files:
- threejs/oneqt/ImageCube.qml
- threejs/oneqt/InfoSheet.qml
- threejs/oneqt/Navibutton.qml
- threejs/oneqt/SwipeArea.qml
- threejs/oneqt/imagecube.js
- threejs/oneqt/main.cpp
- threejs/oneqt/oneqt.pro
- threejs/oneqt/oneqt.qml
- threejs/oneqt/oneqt.qrc
Images:
- threejs/oneqt/ios/OneQtIcon29x29.png
- threejs/oneqt/ios/OneQtIcon29x29@2x.png
- threejs/oneqt/ios/OneQtIcon29x29@2x~ipad.png
- threejs/oneqt/ios/OneQtIcon29x29~ipad.png
- threejs/oneqt/ios/OneQtIcon40x40@2x.png
- threejs/oneqt/ios/OneQtIcon40x40@2x~ipad.png
- threejs/oneqt/ios/OneQtIcon40x40~ipad.png
- threejs/oneqt/ios/OneQtIcon50x50@2x~ipad.png
- threejs/oneqt/ios/OneQtIcon50x50~ipad.png
- threejs/oneqt/ios/OneQtIcon57x57.png
- threejs/oneqt/ios/OneQtIcon57x57@2x.png
- threejs/oneqt/ios/OneQtIcon60x60@2x.png
- threejs/oneqt/ios/OneQtIcon72x72@2x~ipad.png
- threejs/oneqt/ios/OneQtIcon72x72~ipad.png
- threejs/oneqt/ios/OneQtIcon76x76@2x~ipad.png
- threejs/oneqt/ios/OneQtIcon76x76~ipad.png
- threejs/oneqt/textures/dataviz.jpg
- threejs/oneqt/textures/devices.png
- threejs/oneqt/textures/embedded.png
- threejs/oneqt/textures/iot.png
- threejs/oneqt/textures/multiscreen.png
- threejs/oneqt/textures/puzzle-pieces.png
- threejs/oneqt/textures/qtlogo.png
- threejs/oneqt/textures/qtlogosmall.png